Natural hair braiding is one of the most powerful, most beautiful, and most culturally resonant intersections of art and hair care that exists. For people with naturally textured, coily, kinky, or curly hair, braided hairstyles represent far more than a styling choice they are a form of self-expression, cultural identity, protective hair care, and creative artistry all woven into one. And right now, braided natural hair hairstyles are having one of the most exciting moments in the history of hair trends.

From elaborate geometric cornrow patterns to romantic, flower-adorned twists, from waist-length box braids to intricate scalp designs that belong in a museum, the world of braids for natural hair in 2025 is breathtakingly diverse. Whether you are new to protective styling, a seasoned braid enthusiast looking for your next look, or a content creator seeking the most stunning natural hair braid ideas for your platform, this guide has everything you need.
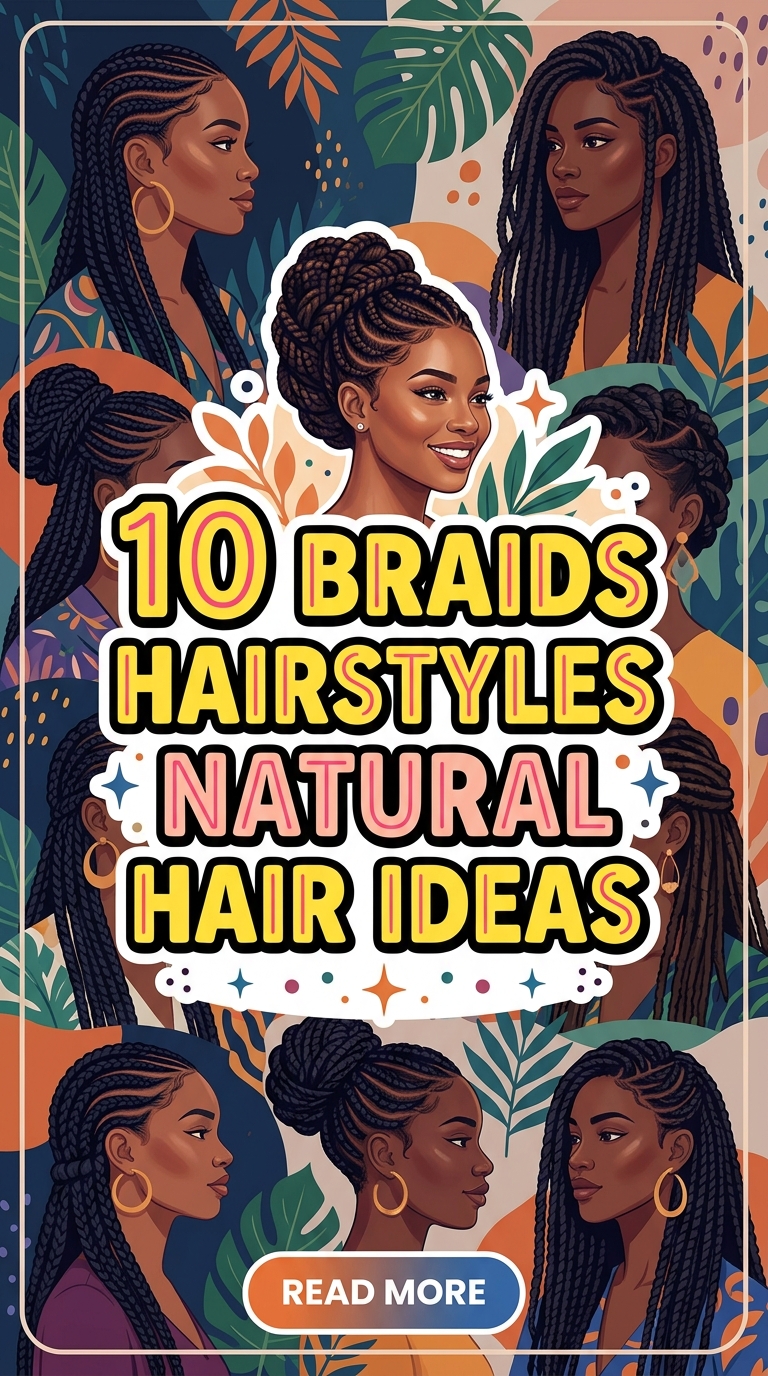
This article covers 10 braids hairstyles natural hair ideas that celebrate natural texture, prioritize hair health, and deliver extraordinary beauty results. Each style includes detailed descriptions, how-to guidance, pro tips, product recommendations, and information on wear time and maintenance. At the end, you will find 10 detailed Pinterest image prompts crafted for content creators and photographers.
Why Braids Are the Ultimate Natural Hair Protective Style
Before exploring the specific styles, it is worth understanding why braids consistently top the list of recommended protective styles for natural hair — and what “protective” actually means in this context.
What makes a hairstyle protective for natural hair:
Natural hair — whether it is 4C coils, 3B curls, or anything in between — is structurally more fragile at the points where it bends and curls. Every manipulation of the hair, every brush stroke, every time strands rub together, creates microscopic damage at those bend points. Over time, this daily manipulation accumulates into breakage, split ends, and length retention loss. Protective styles reduce this daily manipulation to near zero, allowing the hair to simply exist, grow, and retain moisture without constant stress.
Braids specifically offer:
- Length retention — hair protected in braids breaks significantly less than hair that is manipulated daily, allowing it to reach its full growth potential
- Moisture retention — sealed and braided hair loses moisture more slowly than loose natural hair exposed to dry air
- Scalp rest — braids allow the scalp to breathe and recover from daily styling stress
- Low daily maintenance — once installed, most braid styles require only minimal daily care
- Versatility — braided natural hair can be styled in dozens of ways even after installation
With that foundation established, here are the 10 most stunning braids hairstyles for natural hair right now.
1. Cornrow Crown with Natural Coil Out
The Vibe: Regal, celebratory, deeply beautiful, and the perfect marriage of structure and natural texture.
The cornrow crown with natural coil out is one of the most breathtaking natural hair braid styles in existence. It combines the architectural precision of scalp cornrows with the glorious, voluminous beauty of a natural coil-out or wash-and-go, creating a style that is simultaneously structured and wild, controlled and free. The cornrows frame the face and the perimeter of the head while the natural coils bloom upward and outward from the crown in a shape that is nothing short of spectacular.
What Makes It Unique for Natural Hair:
This style celebrates natural hair texture rather than concealing it. The coil-out section — left completely free and defined — is the focal point, while the cornrows serve as an elegant architectural frame. It works beautifully on 3C through 4C hair textures, with the coil pattern becoming the visual centerpiece.
How to Create It:
Start with freshly washed, deeply conditioned natural hair. Section the perimeter of your hair — the edges, temples, and nape — into sections for cornrowing. Apply a firm-hold braid gel or edge control to these sections and cornrow each one toward the crown, braiding close to the scalp. The cornrows from all sides should converge at the crown, leaving the top section of hair completely free. On the free crown section, apply a generous amount of curl defining cream or custard, rake through thoroughly, and allow to dry completely — either by air drying or diffusing. Once dry, gently separate the coils with your fingers, expanding the coil-out into a full, glorious cloud.
Pro Tips:
- The contrast between the smooth, sleek cornrows and the voluminous natural coil-out is what makes this style extraordinary — make the cornrows as clean and precise as possible
- Add gold hair cuffs or beads to the ends of the cornrows where they meet the coil-out section for a regal, adorned finish
- Apply a light oil or shine serum to the cornrow sections after installation for a lustrous, healthy-looking finish
- A silk or satin bonnet worn at night protects both the cornrows and the coil-out — sleep with the coil-out gently pineappled at the top
Best For: 3C to 4C natural hair textures, medium to long natural hair length.
How Long It Lasts: The cornrow portion lasts 2–4 weeks; the coil-out portion can be refreshed daily or every few days.
Occasion: Formal events, cultural celebrations, photoshoots, special occasions, and confident everyday wear.

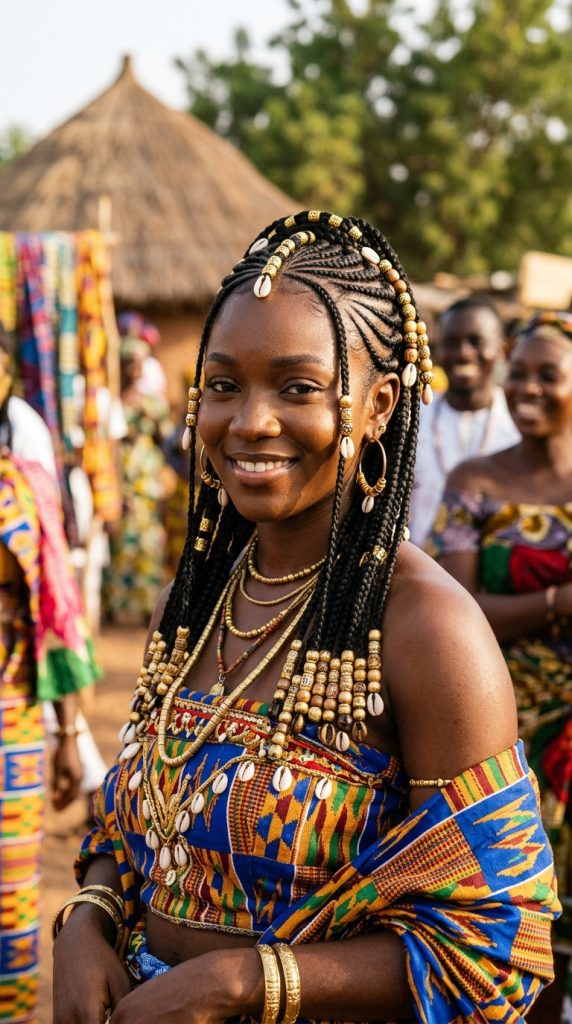
2. Fulani-Inspired Feed-In Braids with Beads
The Vibe: Cultural, intricate, adorned, and spectacularly beautiful.
Fulani braids — rooted in the braiding traditions of the Fula people of West Africa — are characterized by their distinctive combination of a central braid running from the forehead to the nape, cornrowed side sections, face-framing braids near the temples, and abundant beads, rings, and cowrie shell adornments. The feed-in variation uses the gradual hair-adding technique that starts braids thin at the hairline and gradually thickens them for a more natural, graduated look.
What Makes It Unique for Natural Hair:
The Fulani braid pattern is specifically designed to be beautiful on natural Afro-textured hair — the scalp sections between braids are part of the visual design, the natural hair texture at the crown contributes to the overall look, and the bead adornments are integrated organically throughout the style rather than added as an afterthought.
How to Create It:
Begin with the signature center braid, cornrowing from the center front hairline straight back to the nape, using the feed-in technique to gradually add braiding hair for fullness as you progress. Create curved cornrow sections on each side of the head, braiding them backward in gentle curves toward the nape. Create individual braids at the crown and temples, allowing some to hang loose with curly braiding hair at the ends. Thread beads — gold metallic beads, wooden beads, cowrie shells, or glass beads — onto individual braids throughout the style.
Pro Tips:
- The bead selection is as important as the braiding technique — choose beads in combinations of gold, earth tones, and natural materials for an authentic, elevated result
- Face-framing elements are essential to Fulani braids — ensure at least two thin braids run close to the hairline on each side, framing the face and temples
- Mixing braid sizes adds incredible visual complexity — thin cornrow sections on the sides paired with thicker individual braids at the top and loose curly ends at the temples
- Document the installation process if possible — the in-progress photos of Fulani braids are often as stunning as the finished result
Best For: All natural hair textures, particularly beautiful on 4A to 4C coils.
How Long It Lasts: 4–6 weeks.
Occasion: Cultural celebrations, formal events, meaningful occasions, everyday natural hair celebration.
3. Jumbo Knotless Box Braids
The Vibe: Bold, voluminous, modern, and effortlessly commanding.
Jumbo knotless box braids are the natural hair world’s answer to maximum impact with minimum scalp stress. The knotless technique — feeding braiding hair gradually into the natural hair rather than attaching it with a knot at the root — distributes tension evenly and produces braids that lie beautifully flat at the scalp. In the jumbo size, each individual braid is thick, full, and dramatically visible, creating a style with incredible presence and versatility.
What Makes It Unique for Natural Hair:
Knotless braids are the most scalp-friendly braiding technique available, making them ideal for natural hair that may already be managing dryness, tension sensitivity, or edge fragility. The jumbo size means fewer individual braids, which means significantly less installation tension on the scalp overall. Natural hair thrives in knotless jumbo braids because the technique honors the hair’s health as much as its beauty.
How to Create It:
Section clean, moisturized natural hair into large square sections using a rat tail comb. The size of each section determines the final braid thickness — for jumbo braids, each section should be approximately one to one and a half inches square. Begin braiding with the natural hair alone for the first inch, then gradually feed in pre-stretched braiding hair, adding more with each pass. Continue to the desired length. Seal ends by dipping in lukewarm water or carefully using the tip of a lighter.
Pro Tips:
- Moisturize your natural hair thoroughly before installation — apply a leave-in conditioner and a light oil and allow to absorb fully before braiding begins
- Pre-stretched kanekalon braiding hair significantly reduces installation time and creates a more natural-looking finish for jumbo knotless braids
- Color choices dramatically change the personality of jumbo knotless braids — all-black reads as classic and powerful; burgundy or brown ombre reads as warm and romantic; bold colors like cobalt or forest green read as creative and statement-making
- Style jumbo knotless braids in a high ponytail or top knot for a completely different look without reinstalling
Best For: All natural hair textures. Particularly beneficial for natural hair with fine edges or tension sensitivity.
How Long It Lasts: 6–8 weeks with proper maintenance.
Occasion: All occasions — work, events, travel, everyday life.

4. Micro Braids on Natural Hair
The Vibe: Intricate, delicate, precise, and timelessly elegant.
Micro braids represent the opposite end of the size spectrum from jumbo box braids — they are tiny, individual braids that are incredibly fine in diameter, installed across the entire head. On natural hair, micro braids create a look of extraordinary complexity and detail — from a distance, the head appears to have a single, full, flowing style; up close, the hundreds of individual tiny braids are revealed in all their intricate beauty.
What Makes It Unique for Natural Hair:
Micro braids on natural hair create a fascinating interplay between the natural hair’s texture and the precision of the braiding technique. The many fine braids move together like natural hair but with added length and the subtle texture of the braid pattern woven throughout. They are one of the most protective styles available because each individual natural hair strand is wrapped and protected in its own braid.
How to Create It:
Micro braids require patience and time — a full head installation takes anywhere from eight to fourteen hours and should be done by a skilled and experienced braider. The hair is sectioned into very small, uniform sections using a rat tail comb. Thin braiding hair — or sometimes none at all, for the most natural result — is added to each section and braided down to the desired length. The process must be done with consistent tension — not too tight — throughout.
Pro Tips:
- Micro braids are a significant investment of both time and money — find a braider who specializes in them and has a strong portfolio of micro braid work before committing
- Scalp care during the weeks of wear is critical — apply a lightweight scalp oil directly to the scalp through the braids at least twice a week
- Micro braids can be styled in virtually any way that loose natural hair can — pulled into a bun, gathered into a ponytail, worn loose, half up — which is part of their extraordinary appeal
- When removing micro braids, deep condition for at least thirty minutes before beginning the detangling process — this is non-negotiable for preventing breakage
Best For: All natural hair textures, particularly on natural hair with medium to fine strand thickness.
How Long It Lasts: 8–12 weeks, making it one of the longest-lasting braid styles.
Occasion: All occasions — the versatility of micro braids means they transition from professional to casual to formal with ease.
5. Natural Hair Twist-Out to Braid Combination
The Vibe: Textured, romantic, creative, and celebrating the full spectrum of natural hair beauty.
The twist-out to braid combination is a hybrid style that uses natural hair in its most gloriously textured state as the foundation for a structured braid design. Sections of the hair are left in a twist-out — the soft, defined, S-shaped waves created when two-strand twists are unraveled after drying — while other sections are braided into cornrows or individual braids. The combination of textures creates a style of remarkable visual richness.
What Makes It Unique for Natural Hair:
This style is entirely about celebrating what natural hair does naturally. The twist-out pattern — unique to each person’s specific curl and coil pattern — is irreplaceable and unphotographable in its exact form on anyone else’s hair. By incorporating it into a braid design, you create something that is literally one of a kind.
How to Create It:
Start with freshly washed, conditioned natural hair. Apply a twist-out cream or butter to all sections and install two-strand twists throughout the entire head. Allow to dry completely — either air dry overnight or use a hooded dryer. Once fully dry, carefully unravel the twists section by section, separating the coils gently with your fingers. Now decide which sections to braid and which to leave in the twist-out pattern. Typical designs use cornrows at the front and sides to frame the face and define a pattern, while leaving the crown and top sections in the free twist-out.
Pro Tips:
- Allow the twists to dry for a minimum of eight hours — an incompletely dried twist-out will be frizzy and undefined, which undermines the beauty of the combination
- Use a light oil on your fingers while separating the twist-out sections to prevent frizz and add shine
- The design possibilities are endless — experiment with cornrows that converge at the crown to frame a twist-out mohawk, or use a halo of cornrows around the entire perimeter to frame a full crown of twist-out texture
- Document this style with close-up photography — the texture contrast between the smooth braids and the defined twist-out is extraordinarily beautiful in detail shots
Best For: 3C to 4C natural hair with a visible, defined twist-out pattern.
How Long It Lasts: The cornrow portions last 2–3 weeks; the twist-out can be refreshed regularly.
Occasion: Creative everyday wear, photoshoots, natural hair events, cultural celebrations.

6. Triangle Part Knotless Braids
The Vibe: Geometric, modern, fashion-forward, and architecturally stunning.
Triangle part braids take the foundation of knotless box braids and introduce a precise geometric parting pattern — instead of the traditional square sections, the hair is divided into triangular sections, creating a diamond-shaped or star-patterned design at the scalp between the braids. The scalp pattern becomes an integral part of the style’s visual impact, adding a layer of artistry that elevates braids from a hairstyle into a form of wearable geometry.
What Makes It Unique for Natural Hair:
On natural hair, the scalp between triangle parts has its own texture and presence — the natural coils visible at the base of each braid become part of the pattern. This creates a depth and dimensionality that doesn’t exist with other braiding techniques. The geometric scalp design is also an artistic statement that communicates attention to detail and styling sophistication.
How to Create It:
Section the hair into triangular sections using a rat tail comb — each triangle should be consistent in size and orientation for the most visually compelling result. The triangles can point in all the same direction (creating a consistent diamond grid pattern) or alternate direction (creating a zigzag or starburst effect). Apply a firm-hold braid gel to each section and install knotless braids using the feed-in technique, adding braiding hair gradually from the root downward.
Pro Tips:
- The parting is the most technically demanding aspect of triangle part braids — take your time with each section and use a metal rat tail comb for the most precise lines
- Apply a light oil to the scalp sections between braids after installation to keep the scalp moisturized and make the geometric pattern look clean and defined
- Triangle part braids in a single, rich color — all black or all deep brown — allow the geometric scalp pattern to be the visual star without color competing for attention
- Close-up aerial photography of triangle part braids shows the geometric scalp pattern in its full glory — this is one of the most photographed braid details on Pinterest
Best For: All natural hair textures. The natural hair texture visible between the triangle parts adds to the style’s visual richness.
How Long It Lasts: 6–8 weeks.
Occasion: All occasions, particularly striking for events and photoshoots where the detail can be fully appreciated.
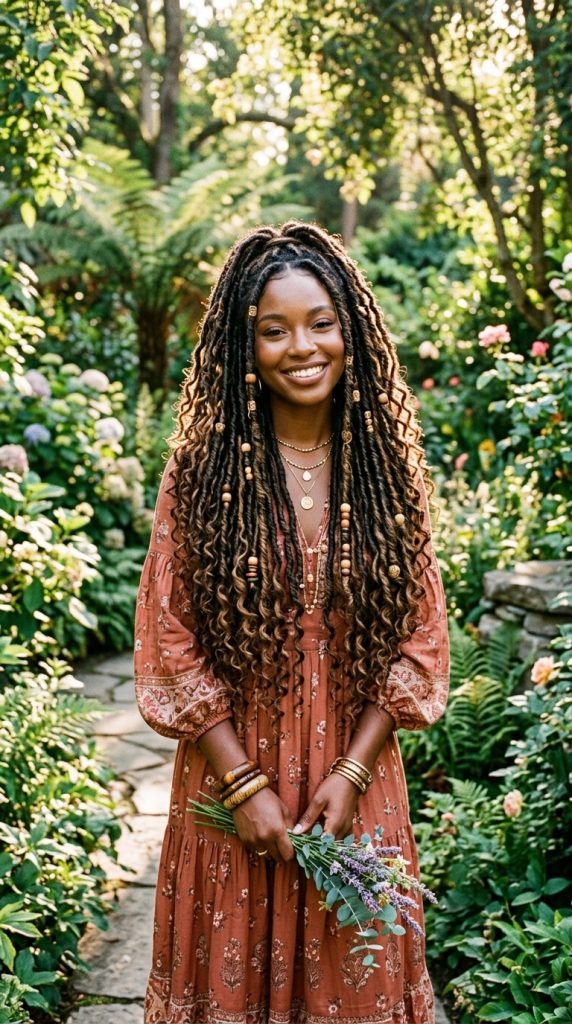
7. Goddess Locs on Natural Hair
The Vibe: Bohemian, flowing, romantic, and effortlessly free-spirited.
Goddess locs are a contemporary style that sits at the intersection of faux locs and boho braids, creating individual locs that have a deliberately undone, romantic, slightly wild quality. Unlike traditional faux locs, which are fully wrapped and uniform, goddess locs incorporate visible curly or wavy texture throughout — often by leaving curly hair extensions unwrapped at the mid-lengths and ends, or by using wavy braiding hair that creates a more organic, less structured look.
What Makes It Unique for Natural Hair:
Natural hair’s inherent texture is a perfect complement to the organic, undone quality of goddess locs. The natural coils and curls at the roots blend seamlessly with the textured locs, and the overall effect is of a style that grew organically rather than being meticulously installed. This organic quality is the entire point — goddess locs are meant to look like a natural hair phenomenon rather than an extension style.
How to Create It:
Goddess locs can be installed using the crochet method or by wrapping. For the wrapping method, section the natural hair into individual sections. Loop braiding hair or wavy loc hair around the natural hair section, then begin wrapping additional hair around the base, moving downward. Instead of wrapping all the way to the end, allow the wrapping to become more loose and irregular in the mid-lengths, and leave the ends completely unwrapped — just the natural braiding hair hanging in its textured, curly state.
Pro Tips:
- The length of goddess locs is a major style decision — shorter goddess locs (collarbone to chest length) have a more bohemian, casual quality; longer goddess locs (waist length and beyond) have a more dramatic, statement-making quality
- Accessorize goddess locs with shells, wooden beads, and wrapped thread for a deeply boho, festival-ready aesthetic
- Mist goddess locs lightly with a curl refreshing spray every few days to reactivate the curly texture at the ends and keep the style looking fresh and defined
- Goddess locs look stunning gathered into a loose, low bun or half-up arrangement — the texture of the loose ends creates a beautiful, romantic effect even when the style is partially gathered
Best For: All natural hair textures. The organic quality of goddess locs works particularly beautifully with naturally textured coils showing at the roots.
How Long It Lasts: 4–6 weeks.
Occasion: Festivals, outdoor events, creative everyday wear, romantic occasions, photoshoots.
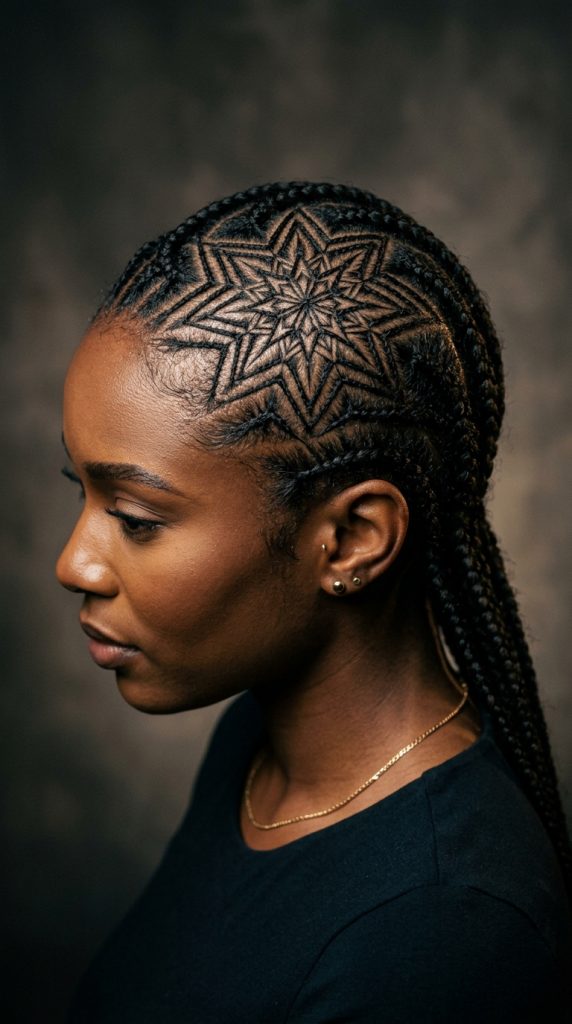
8. Geometric Scalp Art Cornrows
The Vibe: Artistic, precise, bold, and absolutely breathtaking in its complexity.
Geometric scalp art cornrows are the most technically demanding and visually extraordinary style on this list. They transform the scalp into a canvas, using the parting patterns between cornrow sections to create elaborate geometric designs — stars, mandalas, diamonds, swirling spirals, triangular grids, and complex patterns that look like they were drawn rather than braided. This is hair at the intersection of art and sport.
What Makes It Unique for Natural Hair:
On natural hair, the scalp between the cornrow sections is visible and textured — the tiny natural coils peek through the design, adding an organic quality to the geometric lines that makes the art more beautiful, not less. The combination of the precise geometric parting lines and the organic natural hair texture creates a contrast that is uniquely stunning on Afro-textured natural hair.
How to Create It:
This style requires an expert-level braider — someone who has extensive experience with scalp design work and a portfolio that demonstrates their geometric precision. The design is typically sketched or planned before any hair is touched. The parting is done first, using a metal rat tail comb to create the lines of the design with absolute precision. Then each cornrow section is braided, following the design plan meticulously. The finished braids can be left loose at the ends or gathered into a style.
Pro Tips:
- Find your braider by searching specifically for “scalp art” or “geometric cornrow designs” on Instagram and Pinterest — this is a specialist skill and not every braider offers it
- Simple geometric designs are often more stunning than complex ones — a precise star pattern or clean diagonal grid can be more impactful than an overly complicated design
- The scalp between the braided sections needs to be moisturized regularly during wear — apply a lightweight scalp oil along the design lines to keep the skin healthy and the design looking crisp
- Photograph geometric scalp art cornrows from directly above — the bird’s-eye view is the most dramatic and reveals the full scope of the design
Best For: All natural hair textures with at least medium density. Natural hair’s texture makes the visible scalp sections part of the art.
How Long It Lasts: 4–6 weeks.
Occasion: High-impact occasions, photoshoots, editorial work, fashion events, powerful personal expression.
9. Feed-In Braid Ponytail with Natural Hair
The Vibe: Sleek, powerful, elevated, and effortlessly glamorous.
The feed-in braid ponytail is one of the most versatile and universally flattering protective styles for natural hair — and it is experiencing a significant surge in popularity right now. Using the feed-in cornrow technique to create a series of cornrows that converge at the back of the head, the style then transitions into a flowing ponytail — either of natural hair, braiding hair extensions, or a combination of both. The result is a style that is simultaneously sleek and dramatic.
What Makes It Unique for Natural Hair:
The feed-in technique is particularly well-suited to natural hair because it starts with the natural hair alone — no added tension at the root from an immediate knot or attachment. The cornrowed sections frame the face and scalp beautifully, while the ponytail — flowing with natural or extended hair — creates a powerful, elegant silhouette.
How to Create It:
Section the hair into horizontal rows starting from the nape and working upward. Using the feed-in technique, cornrow each row upward and back, gathering toward the crown or the back of the head where the ponytail will sit. As you progress upward, the cornrows curve to meet at the designated ponytail point. Gather all cornrow ends at this point and secure with a hair-friendly elastic. Add braiding hair to the ponytail for length and volume if desired, using the feed-in or wrapping technique to blend it with the natural hair.
Pro Tips:
- The placement of the ponytail — high on the crown for a dramatic, elongating effect, or low at the nape for a sleek, sophisticated result — completely changes the personality of this style
- Edge control applied meticulously at the hairline before and after installation creates the signature sleek, laid look that elevates this style from casual to polished
- Adding a braid wrap around the base of the ponytail — taking a thin section of braiding hair and wrapping it tightly around the elastic — creates a professional, finished detail that looks incredible
- This style transitions beautifully from professional daywear to elevated evening looks — the same installation reads differently depending on accessories and clothing
Best For: All natural hair textures. Particularly beautiful on 4A and 4B natural hair where the cornrow texture is richly visible.
How Long It Lasts: 3–4 weeks.
Occasion: Professional settings, formal events, everyday elevated style, versatile all-occasion wear.

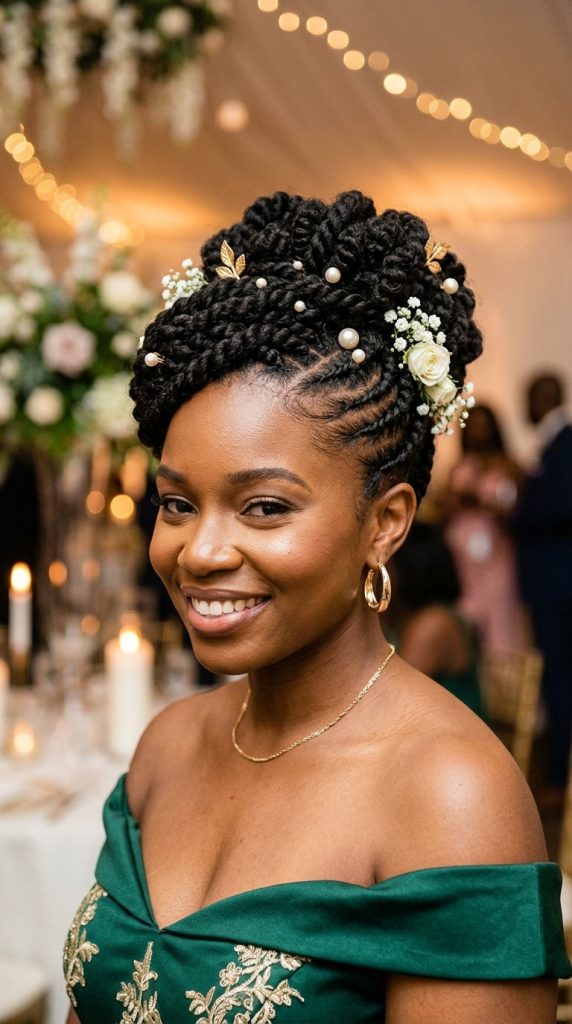
10. Braid and Twist Updo for Natural Hair
The Vibe: Romantic, elaborate, celebratory, and showstopping for special occasions.
The braid and twist updo is the most formal and occasion-appropriate style on this list — a style where braids, twists, cornrows, and natural hair texture are all woven together in an elaborate updo construction that belongs at weddings, galas, formal dinners, and any occasion where you want your natural hair to make the most breathtaking possible statement. This style is natural hair fine dining.
What Makes It Unique for Natural Hair:
The natural hair updo using braids and twists is completely irreplaceable — it cannot be created with straight hair, it cannot be created without the specific texture and density that natural Afro-textured hair brings to the construction. The coils and twists hold their shape, create volume, and interlock in a way that makes this style architecturally possible. Natural hair is not just the medium — it is the reason the style is possible at all.
How to Create It:
This style is typically created in stages. Begin by installing cornrow sections at the nape and sides that will form the base of the updo. Use two-strand twists on the top and crown sections, allowing them to dry completely if time permits. Then the construction begins — gathering sections, folding, pinning, twisting, and layering until the desired updo shape is achieved. Braids and twist sections are pinned upward and arranged to create the overall silhouette — which can be a classic chignon, an elaborate rose-shaped bun, a modern sculptural updo, or any creative shape the stylist envisions.
Pro Tips:
- Work with a natural hair specialist who has experience with updo construction — this style rewards expertise and a clear creative vision
- Accessorize ambitiously — gold pins, floral additions, jeweled clips, pearl ornaments, and beads all look extraordinary in a natural hair braid and twist updo
- Apply a light-hold gel or setting mousse to the twists before the updo construction begins — it makes the twists more pliable and easier to arrange
- Ensure your natural hair is deeply moisturized before installation — dry natural hair is less flexible and more prone to breakage during the manipulation involved in updo construction
Best For: Medium to long natural hair with enough density and length for updo construction. 3C to 4C textures.
How Long It Lasts: 1–3 days as an updo; sections can be taken down and re-worn in multiple ways.
Occasion: Weddings, galas, formal events, graduations, engagement parties, milestone celebrations.
Essential Natural Hair Care Before and During Braiding
The health of your natural hair before you install braids determines the health of your hair when you take them out. Here is the complete preparation and maintenance guide for braided natural hair:
Before Installation:
Deep Condition First — Install braids on deeply conditioned, moisturized natural hair. Use a protein-moisture balanced deep conditioning treatment the night before installation. Dry hair going into a protective style will be even drier when it comes out weeks later.
Pre-Poo if Needed — If your natural hair is extremely dry or prone to breakage, a pre-poo (pre-shampoo treatment with oil or conditioner applied before shampooing) adds an extra layer of moisture before the wash that prepares for installation.
Moisturize Thoroughly — After washing and conditioning, apply a leave-in conditioner and a sealing oil to lock in moisture throughout. Pay special attention to the ends, which are the oldest and most fragile part of natural hair.
Stretch if Desired — Blow-drying or banding the natural hair into a stretched state before installation reduces the risk of tangling during braiding and can make the installation process smoother and faster.
During Wear:
Scalp Oil Application — Natural hair scalp needs regular oiling even when protected in braids. Apply a lightweight oil — jojoba, sweet almond, or a dedicated scalp oil blend — directly to the scalp between braids at least once a week. This prevents the dryness, itching, and flaking that can occur when the scalp is neglected during a protective style.
Nightly Bonnet Routine — A satin or silk bonnet worn every night is non-negotiable during any braided protective style. It prevents friction between the braids and cotton pillowcases that causes frizz, breakage at the hairline, and premature loosening of the style.
Edge Care — The hairline edges are the most vulnerable area. Apply a nourishing edge oil or butter to the edges nightly to keep them moisturized, and never wear braids so tight at the edges that you feel pain or tension. Tension at the edges is the leading cause of traction alopecia.
Washing During Wear — You can and should wash your scalp during a braided protective style. Dilute a gentle, sulfate-free shampoo with water in a spray bottle, apply directly to the scalp, massage gently with your fingertips, and rinse thoroughly. Squeeze (never rub) the braids to remove excess water and allow to air dry completely.
Know When to Remove — No protective style should be left in longer than its recommended wear time. Leaving braids in too long causes the natural hair underneath to mat together, which leads to severe tangling and breakage during removal. Follow the recommended wear times and remove with care, using lots of conditioner and detangling spray.
Choosing the Right Natural Hair Braid Style for Your Lifestyle
Not every braid style suits every lifestyle equally well. Here is a practical guide to matching style to lifestyle:
Active Lifestyle (Sports, Swimming, Gym): Feed-in braid ponytail, jumbo knotless box braids, feed-in cornrows. These styles stay secure during movement, look great in a ponytail, and dry quickly after water exposure.
Professional Environment: Micro braids, feed-in braid ponytail, triangle part knotless braids, cornrow crown. These styles read as polished and intentional in professional settings while celebrating natural hair identity.
Creative or Fashion Industry: Geometric scalp art cornrows, butterfly braids, Fulani-inspired braids, goddess locs. These maximalist, artistic styles fit environments that celebrate bold self-expression.
Special Occasions: Braid and twist updo, cornrow crown with natural coil-out, Fulani braids with full bead adornment. These elevated styles are designed for moments that deserve the most extraordinary version of your natural hair.
Low-Maintenance Priority: Jumbo knotless box braids, goddess locs, Senegalese twists. These styles require the least daily styling effort after installation.
Natural Hair Braid Styles Quick Reference Chart
| Style | Installation Time | Lasts | Tension Level | Best Texture | Occasion |
|---|---|---|---|---|---|
| Cornrow Crown + Coil Out | 2–3 hours | 2–4 weeks | Low-Medium | 3C–4C | Formal, Everyday |
| Fulani Feed-In Braids | 4–6 hours | 4–6 weeks | Low-Medium | All natural | Cultural, Events |
| Jumbo Knotless Box Braids | 4–6 hours | 6–8 weeks | Very Low | All natural | All Occasions |
| Micro Braids | 8–14 hours | 8–12 weeks | Medium | All natural | All Occasions |
| Twist-Out to Braid Combo | 3–5 hours | 2–3 weeks | Low | 3C–4C | Creative, Everyday |
| Triangle Part Knotless | 5–8 hours | 6–8 weeks | Very Low | All natural | All Occasions |
| Goddess Locs | 4–8 hours | 4–6 weeks | Low | All natural | Bohemian, Events |
| Geometric Scalp Art | 5–10 hours | 4–6 weeks | Medium | All natural | High-Impact Events |
| Feed-In Braid Ponytail | 2–4 hours | 3–4 weeks | Low | All natural | Professional, Formal |
| Braid and Twist Updo | 3–6 hours | 1–3 days | Low-Medium | 3C–4C | Weddings, Galas |
Frequently Asked Questions About Braids for Natural Hair
What are the best braids for natural hair growth? Knotless box braids — both jumbo and medium-sized — are widely considered the best braiding style for natural hair growth. The knotless technique eliminates the tension at the root that traditional knot braids create, reducing the risk of traction alopecia and allowing natural hair to grow undisturbed for six to eight weeks. Pair any protective style with consistent scalp moisturizing and a nightly satin bonnet for maximum growth retention.
How long do braids last on natural hair? Wear time varies by style. Micro braids last the longest — up to twelve weeks with proper care. Knotless box braids and Senegalese twists typically last six to eight weeks. Cornrow-based styles and feed-in designs last four to six weeks. Updo styles and combination styles using natural hair texture last one to three weeks.
Can you wash natural hair while in braids? Yes — and it is highly recommended. Dilute a sulfate-free shampoo with water, apply to the scalp between braids, massage gently, and rinse thoroughly. Never go more than two to three weeks without cleansing the scalp during a braided protective style. A clean, healthy scalp supports healthy natural hair growth.
What is the best way to moisturize natural hair in braids? Focus on the scalp rather than the length. Apply a lightweight oil — jojoba, argan, or a dedicated scalp blend — directly to the scalp between the braids at least once a week. For the length, a light water-based mist applied gently to the braids provides surface hydration without causing frizzing.
How do I prevent my edges from breaking in braids? Never install braids with tight tension at the hairline. Apply a nourishing edge oil or butter to the edges nightly. Never slick edges down so tightly that you feel pulling or pain. If you experience headaches in the first days after installation, this is a sign the braids are too tight and should be loosened immediately. Sleep with a satin bonnet every night without exception.
What natural hair length do I need for braids? Most braid styles can be created with as little as three to four inches of natural hair because braiding extensions are added for length and volume. Cornrows can be created on even shorter natural hair. For styles where natural hair texture is a key element — like the cornrow crown with coil-out or the braid and twist updo — medium to longer natural hair length creates more impact and styling versatility.
Final Thoughts
Braids hairstyles for natural hair represent something far greater than any individual style on this list. They represent a living, breathing tradition that has survived centuries, crossed oceans, and emerged into the twenty-first century more vibrant, more creative, and more celebrated than ever. Every braid is a connection — to culture, to community, to the generations of braiders who came before, and to the extraordinary beauty of natural hair in all its textures and forms.
The 10 braids hairstyles natural hair ideas in this guide celebrate all of that — from the regal cornrow crown to the intricate geometric scalp art, from the bohemian goddess locs to the showstopping braid and twist updo. Every style honors natural hair as it is, works with its texture rather than against it, and delivers beauty that is rooted in something real.
Find your braider, prepare your natural hair well, commit to your scalp care routine during wear, and let the art of braiding do what it has always done — create something extraordinary.
Save this guide, share it with your natural hair community, and pin the styles that speak to you. The perfect braid is waiting.